Mechanics of Materials Concept Inventory
The test is currently work in progress and is continually improving with periodic revisions, until a final steady form is reached, perhaps in a few years. We strongly encourage instructors from different institutions to check out the test, give feedback on the questions, administer the test in their courses and share student data with us.

Concepts
The test is organized under four main mechanics of materials concepts:
- Predicting Failure: how applied load, body length, and body cross-section affect maximum normal/shear stress in a solid body
- Predicting Deformation: how applied load, body length, and body cross-section affect extension, twist or deflection in a solid body
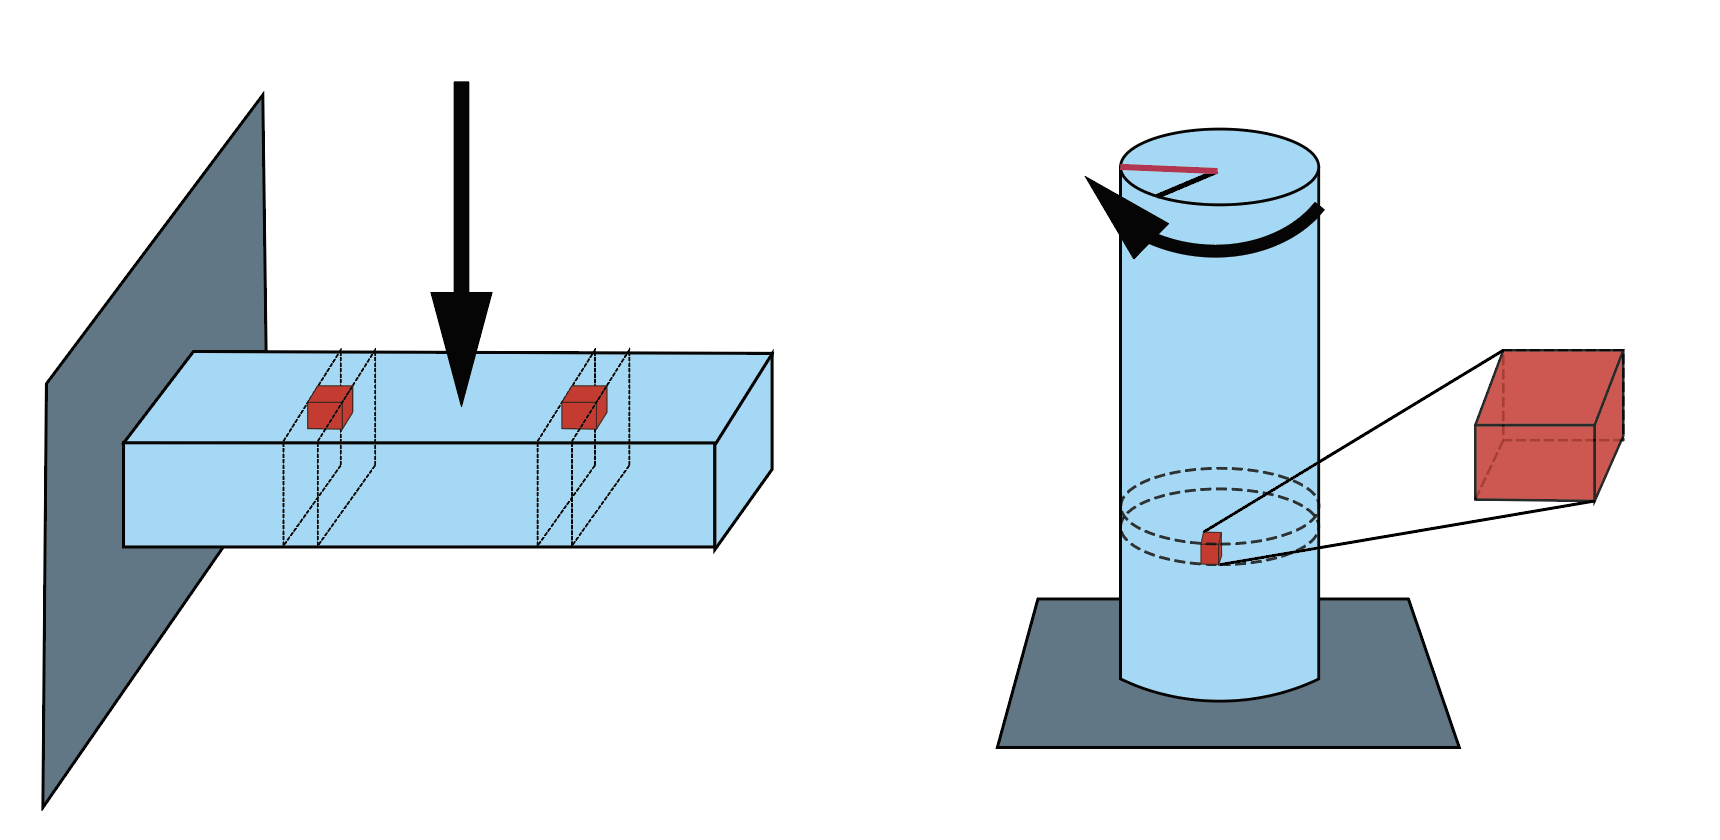
- Predicting Location of Failure: how normal/shear stress is distributed across the volume of a solid body given an applied load (tension, bending, torsion)
- Influence of Material Properties: how material properties can be inferred from experiments, and if and how the derived properties can be used to predict other experiments' results
Most categories have questions with bodies under tension, compression, bending and torsion.
Use Cases
In the context of a Mechanics of Materials course, you could use the MoMCI:
- As an assignment (exam, homework) to:
- assess if/how your students have grasped key concepts in your course
- identify common key concepts that students find challenging
- help students review key concepts in preparation for a final exam (Please don't post the questions in any way, but you can show a situation depicted in a problem and discuss it with students.)
- track individual student improvement, by implementing a test earlier and later in the course (pre and post)
- As a standardized assessment tool to:
- Compare between different instruction methods across different groups of students, instructors, semesters (ideally you would implement this as a pre and a post test each time, and look at individual student improvement to reduce the influence of student backgrounds on your data)
In the context of later courses that rely on Mechanics of Materials (e.g. Mechanical Design, Design Capstone, Finite Element Analysis etc.) you could use the MoMCI:
- At the very beginning, to assess which concepts students are already comfortable with, to see if some key concepts need to be reviewed.
- At the beginning and end, to see if utilizing mechanics of materials concepts in the context of the course have improved student conceptual understanding.
Administer Test
Detailed Test Administration Instructions:
- Getting Access: If you haven't recieved an e-mail with a link to the test, please Request Test. We typically send an email at the beginning of each academic year with the new version of the test.
- Creating the Test: Click on the link sent to you via e-mail. It will prompt you to “make a copy”. This will create a copy that can only be accessed by you, it will be in your own Google Drive.
- Adding collaborators, co-instructors, teaching assistants: You’ll need to add them with their e-mail address. On the top right, click on the three dots, then click on “Add Collaborators”, here you can type in the email of your collaborators and they’ll get an invite to their email. Make sure it’s a Google Email. (You can also send them a link through “Get link”, but that is not very secure and we don’t recommend it.)
- Customizing the test: You can add your own questions in the beginning or at the end. We have not added questions that make students identifiable, so if you need student names, e-mail addresses, student ID numbers, you should add them yourself. Questions can be added by hovering on one of the questions and click on the (+) sign that appears on the right. Do not change or edit any of our questions, including the consent statement in the beginning.
- Administering the test: Once you’re ready to share the test with the students click on the “Send” icon on the top right. Then, you can click on the chain like icon ‘(-)’ next to the mail icon. This will show a link. You can check the “Shorten URL” box, if you’d like a more manageable link. This is the link you’ll be sending your students.
- Closing the test: Once you are done collecting student responses, click on the Responses tab on the Google Form. You should click on the blue slider next to “Accepting responses” so that students can no longer access the questions. (We want to protect the test questions, and so want to limit the time questions are viewable.)
- Looking at your student data on Google Forms: You can look at student data in the Responses tab, Google Forms has a pretty good visual interface.
- Creating a Spreadsheet: You can create a Google spreadsheet with the results, this is how you will share your students’ results with us. You can also make a spreadsheet for your own use as well. Click on the green box (excel icon) that says “Link to Sheets” on the top right when you’re in the Responses Tab. Make sure “Create a new spreadsheet” is checked, then click “Create”. A tab will open with the new spreadsheet. You can use this spreadsheet in any way you’d like.
- Sharing the Spreadsheet with us: We’d like for you to share with us the results using this spreadsheet. Before you send it to us, please remove all columns that were not on the original test, especially identifiable information such as student names and e-mails. Also, remove the rows of all students that did not consent to have their data shared. Download the Google Spreadsheet as a xlsx file. (File → Download → Microsoft Excel) And then, Submit Student Data to submit the spreadsheet. The Google Form has a few questions for you as well.
Members